Basketball: Zero Zones Tier list
Updated: May 5, 2025, 6:36 AM
Zones are passive buffs you can activate in the game. These buffs can help you settle on a playstyle you like by combining it with a specific Zone.
All Zones Ranked
Placement Reasoning
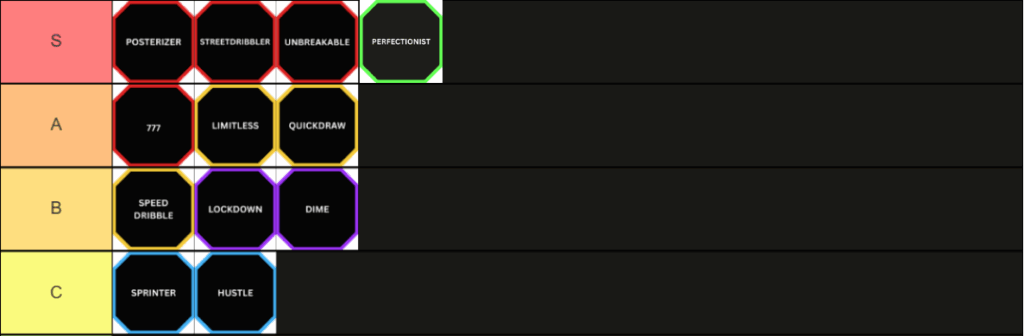
S Tier – The best Zones in the game that work great with any Style. They can get overpowered with certain combos.
A Tier – Great substitutions for S tier Zones, albeit with slightly weaker abilities. May outperform S Tier if combined correctly with matching Styles.
B Tier – Solid Zones that rely heavily on playstyle. B Tier Zones like Dime lack versatility and work best with very specific builds.
C Tier – These Zones pale in comparison with some of the higher-ranked ones. Good for early game, but should be rerolled as soon as possible.
You can click on each Zone to go to its dedicated page and see all moves and our guide for the Zone itself.
S Tier
- Perfectionist ( 0.25% chance to drop from normal spins, 1% from lucky spins ) – This is hands down the best Zone in the game, it gives you a speed boost, increased range and an additional dribble. It gives you a combination of Street Dribbler, Quickdraw and Limitless which are all amazing Zone on their own it’s just that Perfectionist offers the best buff of any Zone and it gives you not just one buff but three.
- Posterizer ( 0.5% chance to drop from normal spins, 5% from lucky spins ) – One of the best Zones in general. Posterizer prevents any blocks while dunking and comes with an additional speed boost.
- Street Dribbler ( 0.5% chance to drop from normal spins, 5% from lucky spins ) – This Zone provides an additional dribble and more speed with the ball. Since dribbling is a key part of the game, it easily ranks at S tier.
- Unbreakable ( 0.5% chance to drop from normal spins, 5% from lucky spins ) – A powerful defensive Zone. Can’t have ankles broken while stealing the ball.
A Tier
- 777 ( 0.5% chance to drop from normal spins, 5% from lucky spins ) – A luck-based Zone that receives great buffs and becomes better with Jackpots. The randomness is its major downside.
- Limitless ( 2% chance to drop from normal spins, 45% form lucky spins ) – Excellent Zone for scoring, with aim assist and extended shot range. This Zone is still good but it only buffs the basic mechanics of shooting. It doesn’t give you an additional move or extra buffs like those in the S tier.
- Quickdraw ( 2% chance to drop from normal spins, 45% form lucky spins )– An all around Zone with increased ball speed and improved aim assist. This is a very solid zone with a great buff for passing but other than that it falls short compared to Zones in S tier.
B Tier
- Speed Dribble ( 2% chance to drop from normal spins, 45% form lucky spins ) – A weaker version of Street Dribbler. Provides movement speed boost while dribbling.
- Lockdown ( 35% chance to drop from normal spins, 50% form lucky spins ) – A very defensive Zone, suited for a more balanced playstyle. Essentially, a worse version of Unbreakable that shortens the cooldown of steals. If you miss, you still get your ankles broken.
- Dime ( 35% chance to drop from normal spins, 50% form lucky spins ) – This Zone can be really good if you are playing a pass-first game and have a Style than complements it.
C Tier
- Sprinter ( 62.5% chance to drop ) – This Zone has only an all-around movement speed boost. It falls short compared with other Zones that give a speed boost plus additional buffs.
- Hustle ( 62.5% chance to drop ) – The speed boost for this Zone applies only while the ball is loose. It’s only useful in specific situations.
About the Author

Working on WIKIs by day, solving mysteries by night. Caviar, known for digging around for crucial information, provides the best quality in all areas of his work.
Comments
Sign in to post a comment.
No comments yet. Be the first to comment!